Well, when we found out Eliza was a girl, that plan went out the window. How could my little girl come home to a boring beige nursery. No way!
But my husband, of course the voice of reason, had to tell me that we could not afford to re-decorate the nursery. Or so he thought! I asked him if I could sell the gender neutral stuff, and use the money to buy new stuff, could I do it. He said only if he had to do nothing. Challenge Accepted!!!
I began by listing all of Riely's gender neutral stuff on craigslist. I was able to get about $250 for it! So that (plus a little help from my friends at my shower) was my budget.
I began by finding an inspiration fabric. This pink, purple and green fabric was the basis for her entire room.
I decided to start with a quilt, since I knew that would be the most money and time consuming. So I took this fabric to a bunch of fabric stores trying to find coordinating fabrics. Then I trolled the internet trying to find a pattern I liked.
Luckily, my friend was also making quilts for her kids, and she found a really cool block pattern that was pretty easy to modify for the dimensions I wanted (crib sized).
Then I set out to buy the fabric. Armed with coupons, I bought 1-2 yards of 6 fabrics, plus 2 yards of flannel for the backing. The initial fabric purchase was about $50.
Then I began the long, long process of piecing it together, sewing it, and quilting it to the backing.
Now to move on to the bumpers. The bumpers I had for Riely didn't line up right with my crib. So I decided to cover the old bumpers, and put the ties where I needed them to be for my crib.
I began with 2 yards of pink, fleece with little stars. I cut the strips to match the size of the original bumper, but with about 1/2 inch extra. Then, because I am crazy, I decided to add welting using the inspiration fabric. This took a long time, but I think it came out great. Then I used extra left over from the quilt to make the ties. Total cost was around $8 for the fleece.
Now for this next item, I can't take credit. My amazing best friend made this mobile for me from the left over inspiration fabric and some cloth ballerinas she found online.
Moving on to the walls. I pulled the pink and green color from the inspiration fabric. I bough a gallon of each, so about $50 for paint. I had all of the rollers and brushes, and I did the work myself.Then I brought in the king of crown molding. My dad! Grandpa and Daddy spent an afternoon installing this awesome chair rail. Total cost, around $40.
I don't know why, but I felt like I needed vinyl. So I ordered this amazing set from a store on etsy. I got the dancers, the stars and the words for just over $50.
The good/bad news is when the guy initially sent it, he cut the words WAY to big. So he sent me another set. Good news is, I used the extra giant E elsewhere in her room.
Now, what's left??? Window coverings!
I used the same black material with ballet slippers from the quilt and made a simple ruffled valence. I then got a spool of ribbon with the same pink and green on it to trim the bottom. Total cost was about $8.
For the sheers, I was worried. I really loved the sheer pink fabric with sparkles, but it was $12.99 per yard. And let's face it, no matter how beautiful it was, I couldn't afford that. But my friend who was throwing my shower used a 50% off coupon and bought the 6 yards to use as table coverings at my shower. Then she gave me the fabric! Score!!! All I had to do was sew a rod pocket along the top, and hem the bottom. Gorgeous!
So for those of you keeping track, we are at $206. Eek, we are running low! So at this point, I broke down and put an extra $50 into the budget as my gift to Eliza. (shh, don't tell daddy). With around $95 dollars left in my budget I turned to accessorizing.
What ballerina room would be complete with out a mirror and bar. I thought, realistically, she wont use this for ballet, but how cute is it? I used an old closet rod and hanging hardware to instal a bar below the window.
I then went to Home Depot and looked for large mirrors, but they were so expensive. So instead I bought these sets of 12x12 mirrors that come in sets of 6 for $19.99. (I bought 2 sets, so $45 after tax)
For this wall, I already had the frames, so I just needed to fill them. I went on eBay and bought 2 classic Degas prints of ballerinas. The outside 2 frames I left empty and have since put pictures of Eliza in them.
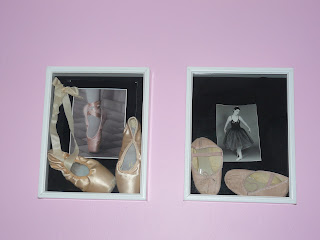
I also already had these shadow boxes, so I used my old ballet shoes to decorate this wall.
I used a die cut machine at a local craft store to cut out her name in chip board, and color coordinating paper. This hangs on her door, $10.
With my last $40 I got some pink and green canvas bins for her book case at Target.
Total room re-decoration was under $300! Mission Accomplished!


No comments:
Post a Comment